Número de parte del fabricante 4500
CLUE NRF52840 EXPRESS
Adafruit Industries LLC
License: See Original Project Programmers
Courtesy of Adafruit
Guide by Dave Astels
Overview
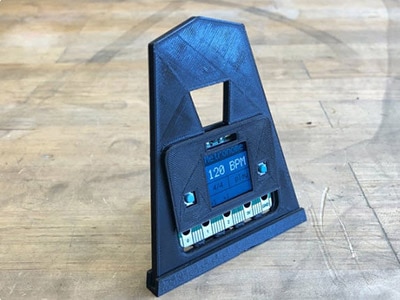
How many times have you been sitting at the game table and needing to roll some dice. But you forgot to bring yours and the dice box is on the other side of the table. All you have within reach is a CLUE (maybe in a snazzy case). If only there was a way to roll dice with your CLUE.
There is. All you need is the code in this guide. Read on to see how to set your CLUE up as a universal set of dice.
Parts
CircuitPython on CLUE
CircuitPython is a derivative of MicroPython designed to simplify experimentation and education on low-cost microcontrollers. It makes it easier than ever to get prototyping by requiring no upfront desktop software downloads. Simply copy and edit files on the CIRCUITPY flash drive to iterate.
The following instructions will show you how to install CircuitPython. If you've already installed CircuitPython but are looking to update it or reinstall it, the same steps work for that as well!
Set up CircuitPython Quick Start!
Follow this quick step-by-step for super-fast Python power :)
Download the latest version of CircuitPython for CLUE from circuitpython.org
Click the link above to download the latest version of CircuitPython for the CLUE.
Download and save it to your desktop (or wherever is handy).
Plug your CLUE into your computer using a known-good USB cable.
A lot of people end up using charge-only USB cables and it is very frustrating! So, make sure you have a USB cable you know is good for data sync.
Double-click the Reset button on the top (magenta arrow) on your board, and you will see the NeoPixel RGB LED (green arrow) turn green. If it turns red, check the USB cable, try another USB port, etc. Note: The little red LED next to the USB connector will pulse red. That's ok!
If double-clicking doesn't work the first time, try again. Sometimes it can take a few tries to get the rhythm right!
You will see a new disk drive appear called CLUEBOOT.
Drag the adafruit-circuitpython-clue-etc.uf2 file to CLUEBOOT.
The LED will flash. Then, the CLUEBOOT drive will disappear, and a new disk drive called CIRCUITPY will appear.
If this is the first time, you're installing CircuitPython or you're doing a completely fresh install after erasing the filesystem, you will have two files - boot_out.txt, and code.py, and one folder - lib on your CIRCUITPY drive.
If CircuitPython was already installed, the files present before reloading CircuitPython should still be present on your CIRCUITPY drive. Loading CircuitPython will not create new files if there was already a CircuitPython filesystem present.
That's it, you're done! :)
Code
Polyhedral dice by SharkD on Wikipedia CCA-SA 3.0
The code in its entirety is shown at the end of this page along with instructions for installing it.
Set up
As usual, we start with some setup: importing libraries, assigning constants and initializing variables.
import time
from random import randint
import board
from adafruit_clue import clue
from adafruit_debouncer import Debouncer
import displayio
from adafruit_bitmap_font import bitmap_font
from adafruit_display_text import label


# input constraints
MAX_NUMBER_OF_DICE = 6
SIDES = [4, 6, 8, 10, 12, 20, 100]

# modes: selecting/result
SELECTING = 0
ROLL_RESULT = 1

# 0-relative, gets adjusted to 1-relative before display/use
number_of_dice = 0
side_selection = 0
There are two constants that you can play around with.
MAX_NUMBER_OF_DICE sets the largest number of dice you can roll at once. Since, as we'll see later, setting the number of dice is done my incrementing the number, eventually wrapping around back to 1, you don't want this to be too big since it gets laborious to set if the maximum is too big.
SIDES contains the different dice that can be rolled, and contains the standard polyhedral dice typically used. Sometimes you want a d3 or a coin flip (a d2). If so, you can add those to the start of the array. The rest of the code adjusts to the size and contents of this array.
SELECTING and ROLL_RESULT are the two modes that the code can be in and determine whether the dice to be rolled are being set or the result of the most recent roll is displayed. We'll see these in use later.
Finally, there are the two variables that contain the currently selected count and die.
Dealing with buttons
We have the classic situation of wanting to do something (advancing the count or die to use) when a button is pressed... not when it's released, and not while it's pressed. If you've been using switches much, you've run into bounce and know that a switch can give you several false presses while it settles into a stable pressed state. Using a debouncer avoids that by filtering out those false presses and providing a definitive the button was pressed indication. See the debouncer module guide for more information.
button_a = Debouncer(lambda: clue.button_a)
button_b = Debouncer(lambda: clue.button_b)
This creates a debouncer for each button. Note that we use a lambda that fetches the value of the button from the Clue object. See the tutorial guide on functions for more information about lambda.
The display
The next step is to set up the displayio groups and labels. See this guide on using CircuitPython's displayio module.
select_font = bitmap_font.load_font('/Helvetica-Bold-36.bdf')
select_font.load_glyphs(b'0123456789XDd')
select_color = 0x0000FF

roll_font = bitmap_font.load_font('/Anton-Regular-104.bdf')
roll_font.load_glyphs(b'0123456789X')
roll_color = 0xFFFFFF

select_label = label.Label(select_font, x=0, y=25, text='XdXXX', color=select_color)
roll_label = label.Label(roll_font, x=0, y=150, text='XXX', color=roll_color)

group = displayio.Group()
group.append(select_label)
group.append(roll_label)

board.DISPLAY.show(group)
This project uses two fonts: one for the dice selection and one for the result of rolling. They are loaded, and the glyphs they will use are preloaded.
The labels are then created, and the group structure is constructed. Finally, the group is placed on the display.
Roll the bones
The function roll does the actual roll of the dice.
def roll(count, sides):
    select_label.text = ''
    for i in range(15):
        roll_value = sum([randint(1, sides) for d in range(count + 1)])
        roll_label.text = str(roll_value)
        roll_label.x = 120 - (roll_label.bounding_box[2] // 2)
        duration = (i * 0.05) / 2
        clue.play_tone(2000, duration)
        time.sleep(duration)
The first thing done is to empty the selection label. This makes it clear that you can't change the dice settings while in roll mode.
To roughly simulate the tumbling of the dice as they settle on to a final value, roll generates a sequence of random values, displaying each one in turn and beeping as it does. There are a couple things of note.
First, the delay between generating and displaying each value in the sequence increases each time. There's a beep and a silent delay, each the same length. This gives the effect of the dice slowly tumbling and stopping.
Second, it doesn't simply generate a random number between 1 and count * sides. Instead, it takes a more realistic approach of rolling count dice, each with a possible value between 1 and sides, inclusive, which are then summed. A list comprehension is used to do this. It generates a list of count random values, one for each value in range(count + 1). This is then passed to the sum method.
count + 1 instead of count, because count is zero based to make the math easier when cycling through values.
The x coordinate of the label is adjusted each time to center the text.
Updating the selection values
As the user presses buttons to change the count and die, the display in select_label needs to be updated. The update_display function does that, taking the values to display as arguments.
def update_display(count, sides):
    select_label.text = '{0}d{1}'.format(count + 1, SIDES[sides])
    select_label.x = 120 - (select_label.bounding_box[2] // 2)
    roll_label.text = ''
There isn't much to this: format the text to be displayed, put it in the label, and recenter the label. It also clears the roll result display since it's no longer valid while the settings are being adjusted.
Preparing to run
Finally, the initial mode is set and the display refreshed.
mode = SELECTING
update_display(number_of_dice, side_selection)
The main loop
The final code to consider is the main loop. Let's step through it.
while True:
    button_a.update()
    button_b.update()

    if mode == SELECTING:
        if button_a.rose:
            number_of_dice = ((number_of_dice + 1) % MAX_NUMBER_OF_DICE)
            update_display(number_of_dice, side_selection)
        elif button_b.rose:
            side_selection = (side_selection + 1) % len(SIDES)
            update_display(number_of_dice, side_selection)
        elif clue.shake(shake_threshold=25):
            mode = ROLL_RESULT
            if SIDES[side_selection] == 100:   # only roll one percentile
                number_of_dice = 0
                update_display(number_of_dice, side_selection)
            roll(number_of_dice, SIDES[side_selection])
    else:
        if button_a.rose or button_b.rose:   # back to dice selection
            mode = SELECTING
            update_display(number_of_dice, side_selection)
        elif clue.shake(shake_threshold=25):   # reroll
            roll(number_of_dice, SIDES[side_selection])
Since we are using debouncers, the very first thing that's done in the loop is the update of all them. This is what makes them work.
What happens next depends on what mode the system is in.
If the mode is SELECTING, a press of button A or B advance the number or type of die, respectively. A shake results in a few things happening. First the mode being changed to ROLL_RESULT. Then it checks to see if the selected die is a percentile die (a 100-sided die), and if so, the count is set to one since you never roll more than one. Finally, a roll is made using the roll function described above.
If the mode is ROLL_RESULT, a press of button A or B will switch back to the SELECTING mode. A shake in this mode will reroll the selected number and type of dice.
Installing Project Code
To use with CircuitPython, you need to first install a few libraries, into the lib folder on your CIRCUITPY drive. Then you need to update code.py with the example script.
Thankfully, we can do this in one go. In the example below, click the Download Project Bundle button below to download the necessary libraries and the code.py file in a zip file. Extract the contents of the zip file, open the directory CLUE_Dice_Roller/ and then click on the directory that matches the version of CircuitPython you're using and copy the contents of that directory to your CIRCUITPY drive.
Your CIRCUITPY drive should now look similar to the following image:
# SPDX-FileCopyrightText: 2020 Dave Astels for Adafruit Industries
#
# SPDX-License-Identifier: MIT

"""
Dice roller for CLUE

Set the number of dice with button A (1-2-3-4-5-6)
and the type with button B (d4-d6-d8-d10-d12-d20-d100).
Roll by shaking.
Pressing either button returns to the dice selection mode.
"""

import time
from random import randint
import board
from adafruit_clue import clue
from adafruit_debouncer import Debouncer
import displayio
from adafruit_bitmap_font import bitmap_font
from adafruit_display_text import label


# input constraints
MAX_NUMBER_OF_DICE = 6
SIDES = [4, 6, 8, 10, 12, 20, 100]

# modes: selecting/result
SELECTING = 0
ROLL_RESULT = 1

# 0-relative, gets adjusted to 1-relative before display/use
number_of_dice = 0
side_selection = 0

button_a = Debouncer(lambda: clue.button_a)
button_b = Debouncer(lambda: clue.button_b)

# Set up display

select_font = bitmap_font.load_font('/Helvetica-Bold-36.bdf')
select_font.load_glyphs(b'0123456789XDd')
select_color = 0xDB4379

roll_font = bitmap_font.load_font('/Anton-Regular-104.bdf')
roll_font.load_glyphs(b'0123456789X')
roll_color = 0xFFFFFF

select_label = label.Label(select_font, x=0, y=25, text='XdXXX', color=select_color)
roll_label = label.Label(roll_font, x=0, y=150, text='XXX', color=roll_color)

group = displayio.Group()
group.append(select_label)
group.append(roll_label)

board.DISPLAY.show(group)

# Helper functions

def roll(count, sides):
    select_label.text = ''
    for i in range(15):
        roll_value = sum([randint(1, sides) for _ in range(count + 1)])
        roll_label.text = str(roll_value)
        roll_label.x = 120 - (roll_label.bounding_box[2] // 2)
        duration = (i * 0.05) / 2
        clue.play_tone(2000, duration)
        time.sleep(duration)


def update_display(count, sides):
    select_label.text = '{0}d{1}'.format(count + 1, SIDES[sides])
    select_label.x = 120 - (select_label.bounding_box[2] // 2)
    roll_label.text = ''


mode = SELECTING
update_display(number_of_dice, side_selection)

while True:
    button_a.update()
    button_b.update()

    if mode == SELECTING:
        if button_a.rose:
            number_of_dice = ((number_of_dice + 1) % MAX_NUMBER_OF_DICE)
            update_display(number_of_dice, side_selection)
        elif button_b.rose:
            side_selection = (side_selection + 1) % len(SIDES)
            update_display(number_of_dice, side_selection)
        elif clue.shake(shake_threshold=25):
            mode = ROLL_RESULT
            if SIDES[side_selection] == 100:   # only roll one percentile
                number_of_dice = 0
                update_display(number_of_dice, side_selection)
            roll(number_of_dice, SIDES[side_selection])
    else:
        if button_a.rose or button_b.rose:   # back to dice selection
            mode = SELECTING
            update_display(number_of_dice, side_selection)
        elif clue.shake(shake_threshold=25):   # reroll
roll(number_of_dice, SIDES[side_selection])Roll with it
Portion of Medieval People at Play, The Walters Art Museum, Baltimore - Public Domain
There are a few ways you could extend this project.
This project has just used the A and B buttons for selecting dice. That limits what we can do. However, the CLUE has touchpads as well. If we used them, we could make a more complex interface. One possibility would be to support selecting multiple groups of dice. E.g., 1d2 + 2d4. We might add a modifier to that to support things like 1d10 + 2d4 + 6.
Another possibility is to make the motion trigger more advanced. In addition to a basic shake, maybe slamming the CLUE (gently) on the table could automatically roll 1d20 (probably the most common roll) regardless of what was selected.
To take it in a different direction, consider that the code doesn't try to model the physics of a tumbling die at all. It blindly generates random numbers. One step to improve this would be to ensure that it won't generate the same number two times in a row. This would make the visual effect better as well: each step in the roll would be more likely to be a different number. This would be especially noticeable when rolling a single die.
These are a few ways to expand on the code in this guide. If you come up with an interesting extension, bring it to our weekly Show and Tell and share it with the community.