Mfr Part # 2177
KITRONIK - MOVEMENT MODULE (SIMP
Kitronik Ltd.
License: See Original Project
Courtesy of Kitronik
Guide by Kitronik Maker
This adorable little plush rabbit is made from felt, coloured with markers and stuffed with cotton batting, and is a nice easy project in and of itself! Add in a linear actuator powered by our Movement Module, hide the battery box and linear actuator inside a top-hat, and you have an easy magic trick!
Follow Emma's instructions below and make your own, as always, we included a list of all of the items we used and the DXF design is provided for you to use/modify.
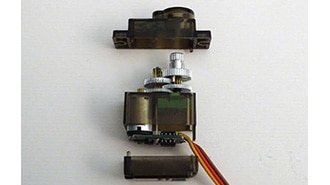
What is the Movement Module?
One of the coolest little gadgets we’ve made for servos is the Movement Module. It allows the use of a servo without the need to code, and with minimal soldering only if you want to use it with an alternative power source like a battery box instead of a micro-USB cable.
What have we used?
Mechanism
Hat & Rabbit
1 x Polypropylene Sheet
White & Red Felt
Cotton Batting (Or other stuffing material)
Thread
Thick-gauge Wire
Markers
Tools
Laser cutter
Sewing Needle
Scissors
STEP 1 - CUT IT OUT:
Cut out a rabbit shape in the size that you want, with little arms and a tail to sew on later. Sew the two sides together, pushing in stuffing as you go. Leave a small gap to insert the tail.
STEP 2 - COLOUR:
Colour in the Rabbit’s face with Markers, and then sew on the arms and tail. Stuff these too for a 3-dimensional effect!
STEP 3 - THE ACTUATOR:
Using a loop of a thick gauge wire, push it up into the bunny through the bottom to give some structure, and loop the bottom of the wire through the top of your linear actuator. Sew through the holes in the linear actuator many times to make sure the rabbit stays on the top of the actuator. For a tighter hold, clamp the loop of wire in place a little with some pliers.
STEP 4 - LASER CUT THE HAT:
Using the dxf provided, laser cut your polypropylene for the hat. Use a Heat gun to bend the various tabs into place, and also to round off the main body of the hat.
STEP 5 - ADDING THE RABBIT TO THE HAT:
Attach the bunny to the middle platform of the hat by pushing the servo through the hole in the flap cut in the centre and using an adhesive (I used hot glue) to secure the servo to the flap and to the bottom of the platform itself.
STEP 6 - MAKING THE HAT:
Put together the hat! As you can see in the image, securing the polypropylene in place with some tape makes it easier to glue the hat together. Hot glue works wonderfully on polypropylene - and don’t worry about the glue joints being messy! We will cover these later.
NOTE: The semicircular hole in the rectangular piece should be at the bottom of the hat enclosure, as the image shows. As you attach the middle platform where the bunny is, you should make sure you leave room underneath for the linear actuator to move, and also have the bunny facing the semicircular hole. Feed the servo lead through this hole.
STEP 7 - ADDING THE BRIM
Glue on the brim! You can use hot glue as shown in the picture, or your choice of adhesive. You may choose to add tabs to the brim if you want to use tape to make securing it in place easier.
STEP 8 - THE SOFT MATERIALS:
Cover the glue joints with strategically placed felt. A round piece of red felt glued into place with hot glue and pleated as you go will make a plush inner hat lining, and a folded strip of white felt makes a good hatband.
And you’re done! Turn on the battery box, press the button and watch the magic!
If you try this or any of the other makes in our resources section of the website, why not send us a picture? We’d love to show off your work in our Gallery! Email your makes to gallery@kitronik.co.uk
©Kitronik Ltd – You may print this page & link to it but must not copy the page or part thereof without Kitronik's prior written consent.